How to Go From STEP to Photoreal Render Without Losing Your Mind
You have a STEP file. Your boss wants a "marketing-quality render" by Friday. You don't have a KeyShot license. Where do you even start?
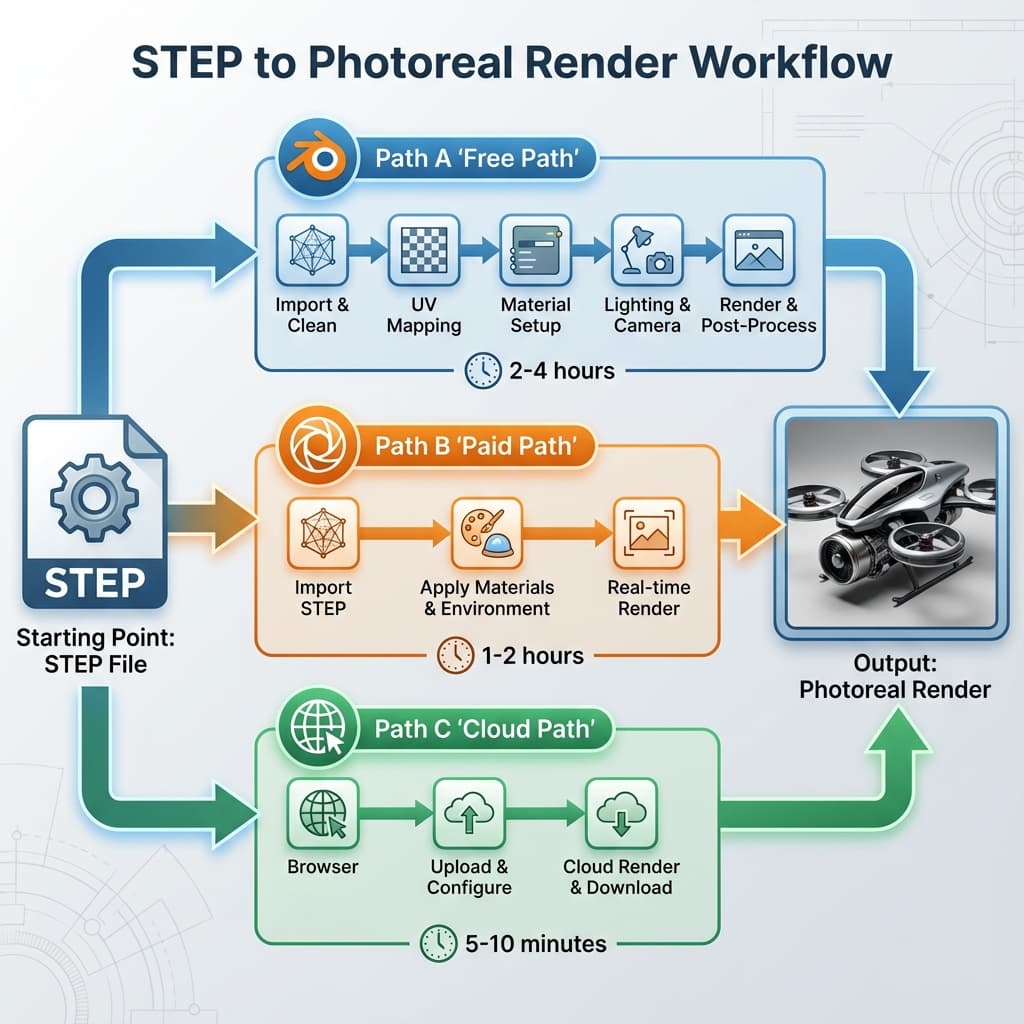
This guide walks through three realistic paths from STEP to photoreal, with time estimates and tradeoffs for each.
Understanding Your Starting Point: What's in a STEP File?
A STEP file (ISO 10303) contains:
Mathematical surface definitions
Part hierarchy and relationships
Part names (often with material hints like BRACKET_AL_6061)
STEP files don't carry texture or color data reliably
It's geometry only—no scene information
Your challenge: add materials, set up lighting, and render—without losing geometric accuracy.
Path A: Blender (Free, 4-6 Hours)
Blender is free and powerful, but requires geometry conversion. Expect friction.
Step 1: Convert STEP to OBJ/FBX
Blender doesn't read STEP natively. You need to convert first:
File → Save As → OBJ (set deviation to 0.01mm)
File → Export → OBJ (High refinement)
FreeCAD can open STEP and export mesh
Step 2: Import and Repair Mesh
- Import OBJ into Blender
- Select all → Edit Mode → Mesh → Clean Up → Merge by Distance (0.0001m)
- Select Non-Manifold (Shift+Ctrl+Alt+M) → Fix holes manually
- Recalculate normals (Shift+N)
⚠️ This step can take 30 min to 2+ hours depending on model complexity. See: The Non-Manifold Trap
Step 3: Apply Materials
Use Blender's Principled BSDF shader
Metallic = 1.0, Roughness = 0.1–0.4
Metallic = 0.0, Roughness = 0.3–0.6
Skip UV mapping if possible—use box projection or triplanar add-ons
Step 4: Lighting and Rendering
Use an HDRI environment (free from Poly Haven)
Add an area light for key illumination
Set Cycles as render engine, 128-256 samples for preview
512+ samples; expect 10-30 min per frame on a mid-range GPU
Path A Summary
Cost: Free | Time: 4-6 hours | Skill: Intermediate | Best for: One-off renders when you have time
Path B: KeyShot (Paid, 1-2 Hours)
KeyShot reads STEP natively and has excellent material presets. It's the "standard" for product visualization.
Step 1: Import STEP Directly
File → Import → Select your STEP file. KeyShot handles tessellation internally. No mesh conversion needed.
Step 2: Apply Materials
Drag materials from the library onto parts
Use the Material Graph for custom effects
Right-click → Link Materials to apply the same material to multiple parts
Step 3: Environment and Camera
Load a studio environment (or HDRI)
Adjust camera angle with turntable or free orbit
Enable ground plane and shadows
Step 4: Render
Render → Queue → Set resolution and samples. Expect 5-15 min for 4K on a workstation GPU.
Path B Summary
Cost: $1,188/year | Time: 1-2 hours | Skill: Beginner | Best for: Professional studios, repeated renders
Path C: Cloud-Native (Reific-Style, 10-30 Minutes)
This workflow eliminates local software entirely. You upload STEP; you get renders.
Step 1: Upload STEP
Drag your STEP file into the browser. Processing happens server-side—no local conversion.
Step 2: Auto-Apply Materials
Cloud platforms often read part names and suggest materials automatically. "BRACKET_AL_6061" → Aluminum preset applied.
Step 3: Adjust and Render
Choose a lighting preset or customize
Orbit to find your angle
After initial processing, final renders typically complete in ~10 seconds (cloud GPUs; quality settings vary)
Step 4: Share or Export
Download PNG/JPEG, or share a live link for stakeholder review with spatial commenting.
Path C Summary
Cost: Subscription | Time: 10-30 min | Skill: Minimal | Best for: Fast iteration, stakeholder sharing, Mac users
Comparison Summary
| Criteria | Blender | KeyShot | Cloud |
|---|---|---|---|
| STEP native import | No | Yes | Yes |
| Mesh cleanup required | Often | Rarely | Never |
| Hardware required | GPU | GPU | Browser only |
| Time to first render | Often hours | Often minutes | Often minutes |
| Cost | Free | Paid | Subscription |
Marketing-Ready Checklist (10 Minutes)
product_rev_camera_material.pngKey Takeaways
- ✓Blender is free but requires mesh conversion and cleanup
- ✓KeyShot imports STEP natively but needs local hardware
- ✓Cloud platforms eliminate both conversion and hardware bottlenecks
- ✓Choose based on your time, budget, and how often you render
Skip the mesh. Skip the wait.
Reific is the cloud-native path: upload STEP once, pick lighting/materials, then get a studio still in ~10 seconds after processing.
Try Cloud RenderingFurther Reading
References
FAQ
Can I create a photoreal render from an STL file?
Yes, but STL files only contain mesh geometry—no material or assembly data. You'll need to: (1) import the STL into a rendering tool, (2) manually assign materials to each part, and (3) set up lighting. Cloud platforms that accept STL can automate much of this, but STEP files preserve more metadata for better automatic material assignment.
How do I render a STEP file online?
Upload your STEP file to a cloud rendering platform like Reific. The platform processes the NURBS geometry server-side, applies materials, and returns rendered images—typically in under a minute. No local software installation or GPU required. This is the fastest path for engineers without dedicated render workstations.
Can I render a Rhino file using online materials?
Export your Rhino model as STEP or 3DM, then upload to a cloud platform. Cloud renderers provide material libraries you can apply directly in the browser. For Rhino-specific workflows, KeyShot's Rhino plugin offers live linking, but requires local KeyShot installation. Cloud platforms trade some control for zero-install convenience.
What's the difference between rendering STEP vs STL vs OBJ files?
STEP preserves NURBS (perfect curves) and assembly structure. STL/OBJ are mesh formats with discrete triangles—curves become approximations. For marketing renders of mechanical parts, STEP gives the best results because there's no loss of geometric precision during tessellation.
How long does it take to create a 3D animation from a STEP file?
For turntable animations, cloud platforms can generate video in minutes after initial processing. Complex animations with assembly motion require more setup—typically hours in KeyShot or Blender. For quick product spins, cloud is fastest; for exploded views or kinematic animation, dedicated software is still necessary.